WATER LEAKING FROM REFRIGERATOR OR INSIDE THE FREEZER OR FRESH FOOD SECTION
Most times this is a plugged defrost drain system. The defrost heater in the freezer section melts the frost and changes it to water, this water is suppose to flow down a drain system. If this drain system is restricted or plugged the water will leak inside the refrigerator. The drain system starts in the freezer section with a tray built under the evaporator coil. The water is funneled through a small hose into a cup in the top middle of the fresh food section ( not on all models, but this is the most common way ), from there, the water is directed out the back wall to a drain hose that runs down the back of the refrigerator into a condensing tray. The heat created under the fridge makes the water evaporate and disappear. Some of the cups (in the top back of the fresh food section) can be removed for cleaning. A turkey baster can be used to help clean out the drain system. Fill the baster with hot water and "blast" it into the drain hose to help flush it out. A piece of wire or pipe cleaner can also be pushed into the drain hoses to help clean then out. On an S x S style of fridge the drain system is in the bottom back of the freezer section and often you will have to remove the evaporator cover to access the drain hole. You can clean this out in the same manner as previously mentioned, but because of the water leaking into the freezer instead of the fresh food section you will have to remove the ice build up to clean out the drain system. For some reason Whirlpool has found a need to "hide" the drain hose inside the walls now (Whirlpool makes many of the Kenmore branded refrigerators) on their top freezer refrigerators. This makes accessing the drain hose to flush it out more difficult, no cup inside the fresh food section, no hose down the outside back wall and the only access is inside the freezer section behind the back false wall and under the evaporator coils. Amana freezer on top models have had many problems with ice building up in the drain spout in the freezer and water leaks out the grills from the ceiling. Some repair kits are available for these refrigerators. You can see them here. There are several things to check for. The condensing defrost tray under the fridge can crack or develop a hole and leak onto the floor. A door gasket not closing properly may cause sweating and leak onto the floor. Some fridge's have a humidity switch inside the fridge that should be turned on to prevent sweating on the center bar between the fridge and freezer section. If your fridge has developed a frost free failure problem, often the frost will travel down the suction line at the back of the fridge and drip water on the floor. The heat exchanger tubing can separate and also sweat and drip on the floor. A kit to repair a separated heat exchanger line, comes with instructions as well. Ice maker and chilled water fill lines can crack and leak as well, this is fairly common with the plastic lines as they can dry out and crack. Thanks! Sea Breeze
WELCOME TO PART 2
Here I want to thank all those Guru's from Fixitnow.com and Applicianjunk.com for all there hard work and great photography!
CLICK HERE=> HOW TO FIX A LEAKING REFRIGERATOR OR FREEZER
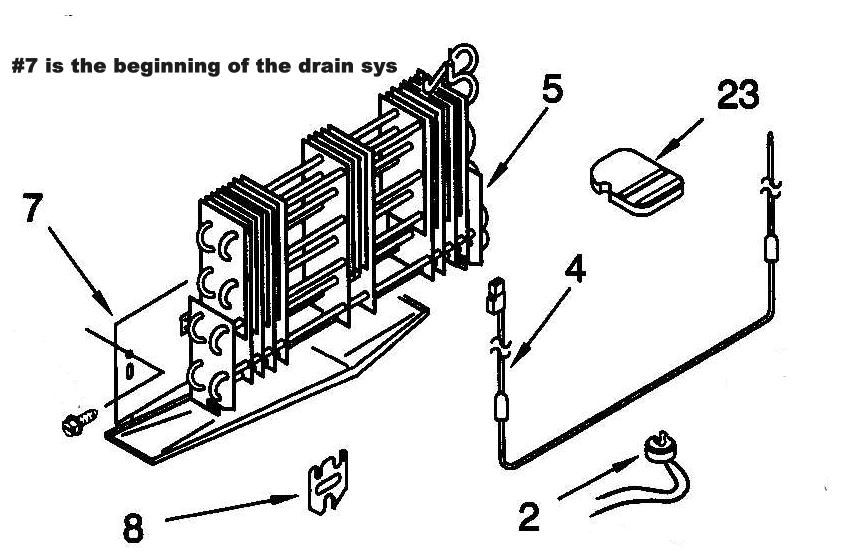
452192 Defrost Heater below that Da74-40149D Water Control Valve


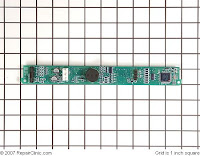
 WR55X10444 and 1156701 Dispenser Control Board

 NEED HELP AND PHONE OR CHAT HELP? CLICK HERE=> SEA BREEZE
 IF MY HELP HAS HELPED YOU, PLEASE CONSIDER A DONATION
 67005154 Dual Water Control Valve
 WR50X10068 Defrost Thermostat
 TESTING FOR A BURNED OUT COMPRESSOR PART 1
TESTING FOR A BURNED OUT COMPRESSOR PART 2
TESTING FOR A BURNED OUT COMPRESSOR PART 1
TESTING FOR A BURNED OUT COMPRESSOR PART 2


